Monopoly fans vote to toss 1 token, add new piece
↧
↧
Rapid Prototyping and You

Today we are going to talk about Rapid Prototyping - techniques and technology which allows us to quickly develop physical products from 3D data.
Much of this technology is available to us mere mortals and allow us to develop and produce products that could someday change the world.
You know - I really like dolls. I like them so much that I've always wanted one of my own mascot character. I did ask a few manufacturers but nobody was interested in making one - so I decided to make them myself just like my line of T-shirts ^^;
Introducing a doll of my mascot character Mirai Suenaga which we have been working on using Rapid Prototyping. For a first attempt I think she's kinda cute ^^;

Not sure why but there are many BJD (Ball Jointed Doll) doll manufacturers in Korea. I was there for a bit last year to learn more about various doll manufacturing processes and visited a few of the makers including SQLabs. It was on this visit where I started to get the idea of producing my doll using CAD instead of traditional manual sculpting. Many of the Korean companies sculpt their dolls using CAD (Computer Aided Design).

I decided to base the looks of my doll on the illustration of Mirai by Japanese illustrator Iizuki Tasuku-sensei. We took the illustration of the eye and stuck it in a resin. I generally prefer my dolls to have resin or acrylic eyes instead of printed eyes.

And this is what she looks like! Its my first time making a doll so the first attempt is certainly nowhere near the level of the other doll companies ><
There is so much to learn including material properties (expansion/shrinkage/strengths etc), breaking points, friction calculations and the list goes on - but Google sensei is always there to help and we'll improve as we go along.

Eventually I decided that we would do everything in 3D. Sculpting it by hand would have taken close to a year and any changes would have been an absolute nightmare. Just imagine I wanted to shrink or expand everything by a few %!

The software we use to sculpt the body is ZBrush which is typically used for movies, games, and animations. Its a great package for sculpting and perfect for making a shapely doll body which is very very important.
See how it was used in movies such as Tron and Avatar below.

Once the body is sculpted, we cut it up!

Now that all the parts are cut up, we can focus on making each piece fit together in a way so that it can be articulated. I decided to make the oppai Mirai sized ^^;

Then the data is imported into 3D Max for various tweaks and to make sure everything moves and fits together.

While I did use 3D Max many moons ago, my Art Director Pinax did the modelling while I supervised the aesthetics, movement and development flow.

The face is mostly generated by a system that we created using morph targets to generate faces ^^ This over here is a test which shows 5 main targets being the two eyes, cheeks and mouth with a bit of texture mapping. We can move the targets around manually or enter numerical value to modify the look of the face.

This is an example of the morph targets in action - the head on the far left is an extreme example with huuuuge eyes ^^;
From now, when we want to make new faces, all we have to do is change values and 3D Max will do the rest - no more sculpting!

If you take a photo of yourself and mirror one side of it, you will notice that you look like an alien as both sides of our face are different. This rule applies to dolls too which is why many computer generated dolls look odd. When faces are sculpted in 3D, in ost cases, one side is sculpted and then just mirrored.
Our system purposely makes both sides of the face look slightly different - just like a human. Faces sculpted by hand will naturally be different on both sides - so if you ever make a face in 3D then take note!
As for our system - I'm thinking that maybe we should distribute it for free so that you can make your own faces too. But need a way to do it so that you dont need 3D Max which costs 3 arms and a leg. All you would then need to do is print the data, sand down, spray and do a Face Up. Face Up is the term used to paint a dolls face.

The face is the most important part of the doll. It is said that 80% of doll buyers decide whether to buy a doll depending on the looks of the face alone.

As the face is the most important, we make sure that we go overboard with the amount of polygons available on the surface for a smooth finish.

We made the hands using bones meaning that we now dont need to sculpt hands again - all we do is to move the bones around and after a few tweaks its ready for printing.

Using Netfabb to prepare the data for printing. All pieces have to fit within a certain area depending on the printer being used.

The output is an STL file which is short for STereoLithography that is widely used for rapid prototyping and computer-aided manufacturing.

We use an Envisiontec Ultra rapid prototyping machine to print the parts. The video below introduces you to the technology.
And the following video goes into more detail as to how the parts are printed.

The bits that you see attached to the hands are called support structures.
How the printer works is that a DLP (Digital Light Processing) projector projects a slice of the 3D model downwards onto a bath of liquid resin which contains a built plate. The area exposed to the light hardens and the build plate moves down into the bath by about 0.2mm where the process is repeated until the model is complete.
Depending on the shape and because the model is built on a plate, support structures have to be created to support the weight of the model. You can read more about this process at Wikipedia under Photopolymerization.

The finish is very smooth but not babyskin smooth and if you look closely at the thumb you will see some staircasing (stepping, steps). The resin is easy to sand though. many of the printing companies (including Envisiontec) claim that the surface requires little or no treatment - not so as you can see from the following photos.
Still, the resin is easy enough to work with so I'm not complaining ^^;

The support structures can be easily snapped off by hand - the remaining bits have to be snipped off and sanded down.

This is the bottom half of the leg. The bigger and heavier the parts are, the bigger the support structures become.

Putting together the arm.

Whenever we print models, we always make sure that large objects are hollowed out or it becomes prohibitively expensive - there is no point paying for resin thats not needed inside the model anyway. This can easily be done in 3D Max using the Boolean Subtract Command - the video below explains how this is done.

Torso with support structure...

...and after the support structures have been snapped off by hand - the rest need to be snipped of and the surface sanded down. Using some techniques from my old Gundam tutorial, the surface will be made babyskin smooth.

Support structures are usually added by whoever is doing the printing for you. Even though many of the 3D printers are developed outside of Japan, Japan has many 3D printing services as you can see from this search result.
Most places also state the price too. All these parts cost me about 100,000 yen to print.
I had a look at printing services outside of Japan and most of them are "contact us for a quote" and never state the price.

The support structures inside the torso turned out to be thicker than I imagined.

When removing support structures, always be careful when snipping as they fly all over the place.

I designed the oppai to cover up the split between the torso so that it would look good in a bikini. This type of joint also allows for dynamic poses too.

And this is Mirai-chan's head - very light sanding needed.

Coming along nicely ^o^

Now to place all the parts together to see if everything fits.


If I wanted to make different bust sizes, all I need to do is model them in ZBrush and convert to STL format then print.

Sitting pose. Designing a doll is a challenge to strike a balance between articulation and aesthetics. Which is more important to you?
There is a poll embedded in this article.

Disassembled and time to sand down the surface and apply a primer.

Messy workspace ><

And this is what my Mirai looks like after sanding down, priming and a few cans of spray paint. The surface looks a bit blotchy due to some dodgy sanding work though ><
The eyes were made by a friend out of resin - I just passed her the illustration of the eye. The Face Up done by another friend too.

At this stage, I think you can tell that I'm being slightly mum's the word about the nitty gritty. I will give you more details when the bird lime is right.

And this post outlines the other type of rapid prototyping that is available to us - was made for me when filming Culture Japan season 1.

While we are on the subject of 3D, I thought I'd dig up some of my old 3D Max projects. This image is my first ever render after studying the basics of modelling, shadows, lighting and reflections. Kinda embarrassing piece of work to look at now but we all got to start somewhere ^^;
I took Japanese and Korean language at university so didn't have the chance to learn computing academically. Luckily I had the help of search engines to help me learn 3D Max from the internets ^o^

I played with 3D Max for quite a bit and my skills slowly started to improve over time.

This is one of my jet fighters - the 4 onboard engines enable it to travel into deep space. Here it is in liquify mode out running the explosion of some nebula or something - one of the engine ruptures as it tries to escape ^^;

I called this piece "V-Clone" as it was based on my favorite ship design being the Vic Viper from the Gradius series.

At this time, I got a bit better at rendering explosions - as you can see, I like the ship-trying-to-out-run-exploding-something-and-engine-ruptures theme ^^;

Not to scale ^^;

I liked the V Clone so much that I would use it to travel back to the UK.

I called this piece "slipstream" referring to the tunnel of light that the V Clone is passing through - I remember it taking me absolutely ages to do! Then one day it turned out just the way I wanted - the sense of achievement turned out to be one that I still remember this day - a sunny Saturday morning just before wifey called me over to the living room for lunch ^^;

I posted my 3D work back on this site many moons ago and also rendered some of the UI in 3D too. It was this work that got me a job at Job Dragon which lead me to get a job as Website Manager for Amazon. If I didn't learn 3D Max or share my work online, then my life path may have been very different indeed.
I always encourage folks to spend time learning in their own time from the Internets and sharing their work online - it always always leads to new friendship and opportunity.

At that time I also shared the model data for my 3D max work - and I think I should share the data for my Mirai-chan doll too ^o^
As for the other thumbnails - many of them are cheesy composites of my wife and I in movie style photos - but working on them helped me learn the ropes of photoshop.

Here is another example of some 3D renders I done that I used in the UI of the website. After a while, the content started to increase meaning that this layout became unscalable ><
Anyway, what I wanted to convey in this post is that it does not matter what line of work or schooling you are in - you have absolutely no excuse not to start learning additional skills and you can do so easily from the Internets. Once you have gained new learnings, make sure you share them with others on and offline as it always brings about new opportunities.
This post mainly covered 3D design and rapid prototyping - now that you know what tools available to you, why not try your dab hand at making something that could mainly change the world. Dont rely on anybody making it for you - go and make it yourself!
If you want to mass produce then as long as you have the data then you can easily make moulds - be it injection moulding, cast, slush or whatever.
If you need cash, then maybe try crowd funding on Kickstarter - or go and get yourself a job in a restaurant as a waiter just like I did to make cash.

Here again you can see some of my dodgy sanding work around the back of the head ><
As I mentioned earlier - I'm a newbie when it comes to developing dolls but am learning new things every day so that I can continue to improve her joints and wot not.
Its taken us 4 months to get up to this stage which is a pretty short development cycle - all thanks to technology and an amazing Art Director onboard ^o^
But there is also another ingredient - passion. If you are passionate about something, you can make it happen because once you make it a need - you *will* make it happen.
It does not matter if nobody around you believes in what you do - just as long as you truly believe in yourself.
Anyway, I'll keep you in the loop with progress on my Mirai-chan doll and hopefully will be able to introduce you to her at the next anime event that I attend ^o^
If you doll owners have any feedback on design or pose-ability then drop a note below ^o^
Now that you know what tools are available to you - what do you want to try making?
There is a poll embedded in this article.

Read more about Mirai Suenaga >>>

↧
Hot Toys Reveals Storm Shadow G.I. Joe Retaliation Figure!
Following his nemesis, the second figure in Hot Toys' upcoming G.I. Joe Retaliation Movie Masterpiece Series has been revealed to be based on Storm Shadow. Click through to see all the images and check out the product information. Don't forget to leave a comment to let everyone know what you think of this stunning figure.
↧
Toy Fair Teaser: What's This New Iron Man Collection?
We all know there is a big movie on its way, and that'll mean a lot of Iron-Man related products on store shelves... But why are we seeing Hulk, Wolverine, and Spider-Man in the same collection? The answer is only days away. Keep your eyes on CTR this weekend for the answer as our 2013 Toy Fair coverage begins!
↧
Hasbro's Iron Patriot Reveals Iron Man 3 Spoiler?
If you haven't seen the Superbowl trailer and want to remain in the dark, by all means do not click the thumbnail above, but if you really want to know who is in the Iron Patriot armour in the upcoming Iron Man 3 feature film click away! Even though the toys are not meant to be on store shelves just yet, some stockers have disregarded the street dates printed on the shipper boxes and in doing so plot elements have been revealed.
↧
↧
Gentle Giant's Thing Bookend, Kotobukiya's Green Lantern, Wolverine & More At Urban-Collector.com

↧
The Reveal of Storm Shadow 1/6 by Hot Toys (for 'G.I.Joe: Retaliation')
After the announcement of their eye-bendingly awesome Snake-Eyes in 1/6th-scale, Hot Toys reveals yet another beauty of articulation from the upcoming movie "G.I.Joe: Retaliation': STORM SHADOW! Based on the facial-image of Korean hunk Lee Byung Hun, this looks to be indeed a splendid sculpt! Now you NEED both Snake and Storm to be in the same display shelf, no?
Check with your fav retailers/![]()
↧
New Figures from Mark Ultra: Black Guard 2 + UltraColors (Feb 7 sale)
Releasing this Thursday the 7th at 11pm EST from Mark Ultra is a series of resin figurines - featuring BLACK GUARD 2 (shown above) priced at US$16 - "After selling out almost instantly, and getting emails from all over the world requesting more, I've brought the black guard back for another go!" adds Mike.
Shown below are two multicolored series, with the left showcasing ULTRACOLOR MIX-UPS, ![]()
↧
Toys as art: Calleja and Ibanez on the culture of toy making
Toy artists Jan Calleja and Gilbert Ibanez are now slowly making waves in the designer toys arena, creating one-of-a-kind pieces that tell a story.
↧
↧
Vapore in Love

The more I look at Vapore, the more I like her. Today she is dressed in the outfit called "Love" which I acquired by trading with another collector. The purse is her own.
↧
Hot Toys 1/6th Scale GI Joe Retaliation Storm Shadow Collectible Figure
Following the firstly launched character of the Snake Eyes Collectible Figure from the upcoming G.I. Joe Retaliation movie, Hot Toys is thrilled to present the white ninja – the Storm Shadow Collectible Figure who comes from the villainous Cobra organization. The movie-accurate collectible is specially crafted based on the image of Lee Byung Hun as [...]
The post Hot Toys 1/6th Scale GI Joe Retaliation Storm Shadow Collectible Figure appeared first on Toywiz and Toy Garden.
↧
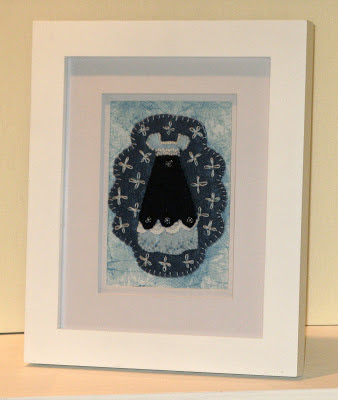
Waltz Thru The Pink Night Belles - New Penny Rug Victorian Dress Pictures Decorations E-Pattern

I just love Victorian Era dresses and also love creating penny rug pictures using wool felt and thought penny rug Victorian dress picture decorations would be nice. So, my Victorian Dresses Series was born.


Waltz Thru The Pink Night Belles is an e-pattern to create two 5" by 7" Victorian wool felt dress pictures in 7" by 9" purchased picture frame with dresses in a penny rug style design.
Each felt dress piece is embroidered to the felt background and each felt dress overskirt piece is embroidered to it’s respective felt dress piece. Lace trims, seed beads, and other embellishments are sewn to the dresses and overskirt pieces.
The base and back lining are blanket stitch embroidered along the edges. Chain stitching is embroidered around the edges.
The pattern can be made as just a penny rug wool felt blanket stitched picture or enclosed within a wall picture frame or tabletop picture frame.
The pattern includes text instructions, step-by-step color diagrams for finishing the penny rug dress pictures from start to finish, full page picture layout sheet, and full page single sided pattern piece sheets. The pattern also includes step-by-step illustrations and instructions for Basic Blanket Stitching and Basic Chain Stitch Instructions.

For more information on my Waltz Thru The Pink Night Belles e-pattern please CLICK HERE.
Posted by Linda Walsh Originals- "Doll Patterns for Grown-up Girls!"
Linda Walsh Originals E-Patterns - "Instant Download E-Patterns for Grown-up Girls!"
Linda Walsh Originals Dolls - "Handmade Dolls & Crafts for Grown-up Girls!"

↧
Waltz Thru The Night Blue Belles - New Penny Rug Victorian Dresses Picture Decorations E-Pattern

I just love Victorian Era dresses and also love creating penny rug pictures using wool felt and thought penny rug Victorian dress picture decorations would be nice. So, my Victorian Dresses Series was born.
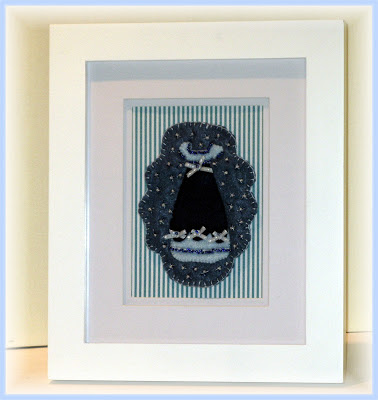
Waltz Thru The Night Blue Belles is an e-pattern to create two 8" by 10" Victorian wool felt dress pictures in 10" by 12" purchased picture frame with dresses in a penny rug style design.
Each felt dress piece is embroidered to the felt background and each felt dress overskirt piece is embroidered to it’s respective felt dress piece. Lace trims, seed beads, and other embellishments are sewn to the dresses and overskirt pieces.
The base and back lining are blanket stitch embroidered along the edges. Lazy Daisy Flowers combination floss are embroidered all over the base for one and beaded combination crosses are beaded all over the base for the other.
The pattern can be made as just a penny rug wool felt blanket stitched pictures or enclosed within wall picture frames or tabletop picture frames.
The pattern includes text instructions, step-by-step color diagrams for finishing the penny rug dress pictures from start to finish, full page picture layout sheet, and full page single sided pattern piece sheets. The pattern also includes step-by-step illustrations and instructions for Basic Blanket Stitching.

For more information on my Waltz Thru The Night Blue Belles e-pattern please CLICK HERE.
Posted by Linda Walsh Originals- "Doll Patterns for Grown-up Girls!"
Linda Walsh Originals E-Patterns - "Instant Download E-Patterns for Grown-up Girls!"
Linda Walsh Originals Dolls - "Handmade Dolls & Crafts for Grown-up Girls!"

↧
↧
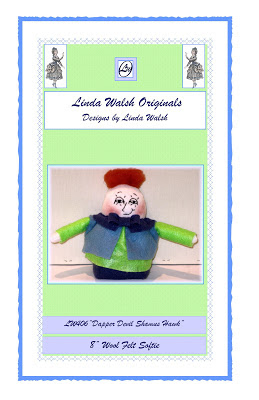
Dapper Devil Shamus Hawk - New Handmade Softie Doll and E-Pattern

The "Egg Muff's" are a fun loving group of dolls that love to sneak around and maybe, every once in awhile, drop in unexpectedly. And, the Toni E. Hawk and her brother, Tom A. Hawk, are the most fun loving of the group. You might find then peaking around a corner, peaking over the windowsill, peaking through a keyhole in a door, or sneaking into your room. You just never know. Sometimes you might just catch a glimpse of their eyes and hair as they try to sneak a peak. If you listen carefully, you might even hear them laughing, even chuckling away. Sometimes you might even catch them doing a little jig. You just never know what they may do. They love to laugh. They love to have fun. But, most of all they love to play hide and peak! No, not hide and seek! Hide and peak!
The 4th oldest is Dapper Devil Shamus Hawk and he is, well, a bit of a devil. He has a wicked sense of humor - in true Hawk fashion. So, he has no problem holding his won with the twins - Tom A. Hawk and Toni E. Hawk.

Dapper Devil Shamus Hawk is an 8" squared bottomed self-standing wool felt softie doll. He has a 1/2 white felt and 1/2 dark blue felt body. His face is outlined and embroidered and he has cunning satin stitched eyes. His nose is pointy and embroidered as is his mouth, eyelashes and eyebrows. He has orange blushed cheeks.
Unlike his brother, Tom A. Hawk, Dapper Devil Shamus Hawk has a modified Mohawk style for his bright orange hair. He is wearing his favorite lime green Irish shirt with dark blue felt collar and favorite light blue felt vest. A matching dark blue felt bow-tie just adds style to his debonair-re outfit.

Dapper Devil Shamus Hawk can definitely hold his own in the Hawk family. He's a Hawk, he's Irish, and he's definitely a rascal. Perhaps the biggest Hawk rascal of all.
For more information on Dapper Devil Shamus Hawk's E-Pattern please CLICK HERE.
Posted by Linda Walsh Originals- "Doll Patterns for Grown-up Girls!"
Linda Walsh Originals E-Patterns - "Instant Download E-Patterns for Grown-up Girls!"
Linda Walsh Originals Dolls - "Handmade Dolls & Crafts for Grown-up Girls!"

↧
Disney Pixar CARS: Disney Store New CHASE CARS …
I guess it saves time and wear and tear if everything is CHASE and limited. It’s the Costco theory – buy it now, you may never see it again. It’s Gold, I tell you, it’s gold! is this a new expression on Lightning McQueen? While Hydro Finn has a bad rep from Mattel’s over, over, [...]
↧
COARSE souls gone mad chapter one: fever and the omens (02.14)
COARSE Toys will soon be releasing their brand figure, which was last seen at their “souls gone mad” exhibit at Rotofugi this passed November. Fever and the omens (three owls) have been turned into vinyl and made ready for your collections. Fever used to sleep peacefully, but omens have begun...
![]()
↧
Monopoly to get new lineup of tokens
↧
↧
Hot Toys - MMS193 - G.I. Joe Retaliation: 1/6th scale Storm Shadow Collectible Figure

↧
set database: LEGO 31001 mini skyflyer
set database: LEGO 31001 mini skyflyer
![]()
![]()
![]()
![]()
![]()
![]()
set name: mini skyflyer
theme: creator, creator mini
year: 2013
pieces: 62
prices: us$7
minifig: none
nice small set.


image courtesy of amazon.com
set number: 31001set name: mini skyflyer
theme: creator, creator mini
year: 2013
pieces: 62
prices: us$7
minifig: none
come with small canister as packaging for storing parts.
can be built into several building alternatives.
included building instructions for mini vehicle models:a skyflyer, a classic airplane and a space rocket.
great parts source.
great playability.
overall design is good.

↧
Mattel Disney Pixar CARS 2 Diecast: The Jeff Gorvette Corvette Logo Variant Update
Well, if you’re collecting ALL the Jeff Gorvette’s and all the variants, there’s a new one … After 2 years, I guess someone looked at the contract they signed with GM-Chevrolet and realized they needed a Corvette logo tampo decal on the hood or they are laughing all the way to the bank. So, if [...]
↧
More Pages to Explore .....


