Christmas is a time of gift giving.
Toys for children
↧
↧
Disney Pixar CARS 2: If You Love Me, You’ll Steal Me
Well, it’s sort of a backhanded tribute, of the @674 movies released in the US, CARS 2 was the 6th most popular movie title search term on BitTorrent sites. So, that’s something. Beaten out only by Thor (#1), Harry Potter, Kung Fu Panda 2, Green Lantern, & Transformers 3 (in this order). ADULTS might want [...]
↧
Engineernerd’s Year in Review 2011
2011 has been an odd year for me. I’ve kind of slid away from my typical collecting and moved into other lines. A couple of big films have highlighted collecting in general this year. Let’s start with the downside. I’ve been a Star Wars collector for a long time. The line is probably the [...]
![]()
↧
Pull-Eze Slow Down
Hey, It’s Jet Here. While the British may have celebrated Boxing Day yesterday, J.J. celebrated CHEW
↧
Mega Bloks Planning a WoW of 2012!
↧
↧
Kidrobot Exclusive Kid Dragon
The Loyal Subjects and Kidrobot have joined forces to offer an exclusive version of their 5-foot tall Kid Dragon by Sam Flores. This three piece fiber glass multiple is an exclusive color way for Kidrobot, and it's limited to only 6 pieces. You'll want to check with your local Kidrobot store, as this massive piece [...]
↧
BOOK REVIEW - Gene Colan's TALES OF THE BATMAN Graphic Novel VOLUME 1

 THE COMICS JOURNAL just published a very nice review of the recent DC Comics Graphic Novel titled "TALES OF THE BATMAN by Gene Colan Volume 1". Sadly, Gene Colan died last year ( June 23rd ) so the timing on this book is well received and could be considered a tribute. This HC Book compiles the first two year's worth of stories from Gene Colan’s five-year run as BATMAN’s Lead Artist ( Pencils ), which began in 1981. I grew-up reading a lot of his work, or I guess I should say, "looking at his work", and have always enjoyed it. Here's a link to the THE COMICS JOURNAL Review. Also, if you're interested in buying this Hardback Book CLICK HERE for a good sale price that is 25% off retail.
↧
Stuff I Learned the Hard Way: A Stun Gun is Not a Toy
WHAT’S PLAYING: Janet Jackson “You Want This” Lesson #2: If you get a pink stun gun for Christmas, D
↧
Review > Nordic Alien (Alien Series, Shadowbox Collectibles)
Dr. Mrs. Ghostal and I have been living in Salem since August and visiting the Liberty Tree Mall fairly frequently since our arrival. However, we usually only visited the large storefronts like Target and Kohl’s, and scarcely realized there was an entire indoor mall behind them. We finally went in yesterday and, in the course [...]
↧
↧
Release of the Grody Shogun Mucky Monster!
PRODUCT-PRESS: Announcing the latest fun mash-up from the mind of Grody Shogun, Mucky Monster! Mucky Monster is the best of both G.S. lovable worlds! Mucky Monster is made up of an assortment of GID Monster bodies, with Karakuri arms & bodies (that make up the ears). Each one is hand painted by Grody Shogun and will include variants, as always! ***Comes in a blind bag assortment, which means you
![]()
↧
Joe Ledbetter Mutant Bunny: Funny Bunny Print
Joe Ledbetter has just released Funny Bunny, the eleventh monthly print in his ongoing Mutant Bunny Print Series #2. This poor Bunny is just a bit mixed up and completely unaware of the impending danger. Limited to 99 s/n pieces, Funny Bunny measures 5” x 7” and is available now...
![]()
↧
set database: LEGO 4636 police building set
set database: LEGO 4636 police building set
![]()
![]()
![]()
![]()
![]()
![]() set number: 4636
set number: 4636
set name: police building set
theme: build and rebuild, police
year: 2012
pieces: 130
prices: us$10
minifigs: 2
new build & rebuild theme.


 set number: 4636
set name: police building set
theme: build and rebuild, police
year: 2012
pieces: 130
prices: us$10
minifigs: 2
come with basic bricks and specialty bricks.
can be built into small police station, jail cell, vehicles, boat and helicopter.
minifigs included a policeman minifig and a robber minifig.
great playability.
overall design is good.
![Bookmark and Share]()
great playability.
overall design is good.


↧
A very fun Christmas commission
One of my tasks this December was to create 3 specific types of plush for Christmas gifts. The commission was from one of my best customers, and it was a really nice creative challenge making them for her.
The first one I was asked to make was a Nutcracker, and after doing a bunch of research and drawing up lots of variations on the idea, I settled on this design. Meet Hans the Nutcracker:
![]()
![]()
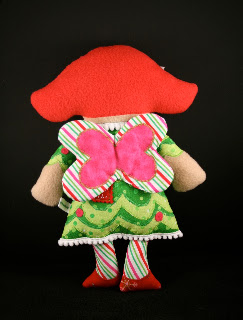
My next objective was creating Eve, the Christmas Fairy- this one also went through a bunch of sketches before I settled on the final design idea:
![]()
I took my inspiration from a Christmas tree- and created my own fabric for her dress from two variations on a green dot cotton fabric, cutting them out and then sewing them together to create a tree-ish design. I added candy cane striped tights, with snowflake shoes, and sparkly felt buckles, and topped it off with a sparkly white felt pointsettia flower in her hair.
![]()
Her wings are created from the same candy cane striped cotton, with bright pink flannel centers.
![]()
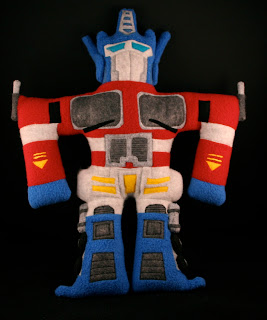
And lastly, and MOST challenging was this guy, Optimus Prime:
![]()
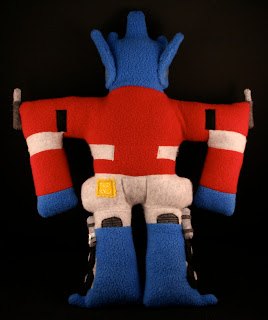
In case any of you don't know, Optimus Prime is the leader of the Autobots. He's made of mostly fleece, with felt accent pieces. I hand sewed on his helmet antennae, exhaust pipes on his shoulders, and the tires and gas tanks on the sides of his legs. I had to somewhat simplify his design to be able to make him in my style, but overall I'm pretty happy with the way that he turned out.
![]()
![]()
These were a TON of fun to make, and I enjoyed this commission a lot. It was really great to make Optimus, since I was/am a big fan of the Transformers. My sister and I had quite a few of the original toys when we were kids- and I kick myself for getting rid of them when we "grew up."
Anyway, I hope that these were a big hit in the home where they landed for Christmas- I know that they almost weren't allowed to leave my house when my family saw how they turned out. ;D
![]()
Well, that's it for 2011- I'll be back in 2012 with new creations. I'm off to spend some time relaxing, re-charging the creative juices, catching up on my reading, and viewing all the content on my DVR that I missed while I was sewing away the past month. :)
Here's to a great year in 2012 to you all!![]()
The first one I was asked to make was a Nutcracker, and after doing a bunch of research and drawing up lots of variations on the idea, I settled on this design. Meet Hans the Nutcracker:

Hans patrols the town, making sure that everyone is in the Christmas spirit. In his spare time he cultivates both holly and mistletoe. He's made of flannel, with fleece for his face and hands, and faux fur for his hair and mustache. His teeth and facial features are made from felt.

My next objective was creating Eve, the Christmas Fairy- this one also went through a bunch of sketches before I settled on the final design idea:

I took my inspiration from a Christmas tree- and created my own fabric for her dress from two variations on a green dot cotton fabric, cutting them out and then sewing them together to create a tree-ish design. I added candy cane striped tights, with snowflake shoes, and sparkly felt buckles, and topped it off with a sparkly white felt pointsettia flower in her hair.

Her wings are created from the same candy cane striped cotton, with bright pink flannel centers.
And lastly, and MOST challenging was this guy, Optimus Prime:
In case any of you don't know, Optimus Prime is the leader of the Autobots. He's made of mostly fleece, with felt accent pieces. I hand sewed on his helmet antennae, exhaust pipes on his shoulders, and the tires and gas tanks on the sides of his legs. I had to somewhat simplify his design to be able to make him in my style, but overall I'm pretty happy with the way that he turned out.

These were a TON of fun to make, and I enjoyed this commission a lot. It was really great to make Optimus, since I was/am a big fan of the Transformers. My sister and I had quite a few of the original toys when we were kids- and I kick myself for getting rid of them when we "grew up."
Anyway, I hope that these were a big hit in the home where they landed for Christmas- I know that they almost weren't allowed to leave my house when my family saw how they turned out. ;D

Well, that's it for 2011- I'll be back in 2012 with new creations. I'm off to spend some time relaxing, re-charging the creative juices, catching up on my reading, and viewing all the content on my DVR that I missed while I was sewing away the past month. :)
Here's to a great year in 2012 to you all!

↧
↧
My Christmas Craft Project With Noodles
It doesn't get much better for a Grandma then getting to spend a delightful weekend with one's grandchild - especially when working on a craft project together.
I know that I've mentioned many times before that when I was a young girl around the holidays my Mom and Dad would encourage us to create something new. Sometimes they helped us with the holiday projects and sometimes they didn't.
So, in talking to my grandson, Noodles, about what we would do when he came over one weekend in November we decided that making something together would be fun. We decided to make a Christmas present that he could give to his grandmother, Mimi.
His original idea was a plaque with the words Grandmother on it. We decided that when he got here we would go down to Michaels or AC Moore and buy the supplies we would need to make the Christmas plaque.
Usually it's Noodles and Nana shopping together, but this time Grampy decided to join us as we had decided to go out to eat afterwards.
So, off we went to Michaels. While Grampy was looking at picture frames Noodles and I went to the unfinished wood area. We looked at the unfinished wood plaques, but he wasn't really happy with them or their size. In looking around he first spotted an unfinished miniature train and thought maybe we could add a snowman or something.
Then he spotted an unfinished log cabin and came up with an idea for some sort of a winter scene. We talked about that and decided we could use the ends of the logs for affixing decorations and maybe add a tree or a Santa. I thought the woodland scene would be nice, so off we went to the paint aisle.
Given that it was a log cabin he decided that we should probably paint it brown. So, we bought a medium shade brown paint. Then off to the Christmas decorations section we went.
The first item he found in the miniature house section was a miniature tree under glass. He thought that would make a great addition but we didn't have a base for the house that it could sit on. So, we decided that we should add an unfinished piece of wood that we could use for a base. However, I thought the tree under glass, while pretty, was a little too big for our scene. So we settled on four miniature trees.
Then he found the miniature lights and thought they would be perfect for our scene. I agreed so we added those to our cart.
We continued walking around the Christmas section finding colorful stickers we could add for decorations and small hanging type ornaments. We found a few items we thought we might use for making some sort of a garland and he found some Christmas ribbons that he liked. Eventually we were joined by Grampy who added a few sticker suggestions of his own.
While we were looking at the bright and cheery Christmas decorations Noodles decided that painting the log cabin white would really make the Christmas decorations stand out. So, we decided to exchange the brown paint for white paint.
While Grampy went to stand in the long cash register line Noodles and I went back to get the white paint and to get an unfinished base. We settled on an oval base.
It was really cold and windy when we put the supplies in the car. It actually looked like it wanted to snow which just added more charm to what was already a delightful shopping trip.
After the supplies were loaded in the car off to dinner we went. At dinner Noodles and I had decided that we would take step-by-step pictures as we went along so I made a mental note to remember to get my camera.
I had decided that it might be best to paint the unfinished base and log cabin downstairs in the basement so off to the basement we went. After spreading the plastic underneath, getting the brushes, and getting the containers for the paint I set to painting the base while Noodles painted the log cabin. We ended up putting two coats of white paint on each and a light coat of satin finish acrylic.
Just as we finished the satin finish Noodles remembered we hadn't taken a picture. Ooops..... Nana's bad! So, I made a mental note that I wouldn't forget the camera in the morning which is when we had decided we would decorate the house.
Before we went to bed we glued the bottom of the log cabin to the wood base.
The next morning I woke Noodles up at 6:30 A.M. to start our project. We had agreed ahead of time that we would get an early start so we could finish before he had to go home. He happily got out of bed at 6:30 A.M. and came downstairs ready to begin.
So we did.......
![]()
Before we began decorating the house Noodles reminded me to take pictures.
Here's what the log cabin and base looked like painted and glued together.
![]()
Next, we tested the lights. At first only three came on. Then when we straightened out the string of lights they all came on. Noodles was delighted. However, when we wrapped the lights around the top of the house they, of course, stopped working. We were back to just three lights. We tried this several times until Nana just gave up. Oh, well. It was a nice idea.
![]()
Next we glued on the miniature trees - two on each side.
![]()
We had bought a foam Santa kit and thought the Santa might be cute coming out of the chimney. So we glued him together and then glued the finished Santa to the top of the chimney.
![]()
Next we glued the foam snowman together and then glued him to the right hand side of the log cabin just behind the trees.
![]()
We had bought three miniature unfinished wood dolls that we thought we could put in the windows, but when I tried to see how they would look I quickly realized there was no way we were going to be able to glue them inside. The doorway and windows were just too small.
So, we decided to glue paper wooden soldiers that we had bought in front of the windows instead. Plus, Noodles wanted the mistletoe over the door so we glued it just above.
![]()
We had bought a bunch of miniature presents, gingerbread men, and stocking stickers that we wanted to affix to the ends of the logs so we did that next.
We wanted to make sure all four sides were decorated so we added stickers to the top of each of the sides and to the back of the log cabin. We had also bought red and gold alphabet stickers so we decided to add the words, "North Pole" to the top of the back of the roof.
As we had an extra miniature soldier sticker we had decided to glue him in the middle of the back of the log cabin.
After that Noodles had found a blue and white adhesive backed "Let It Snow" felt saying that he wanted to put on the front roof so we glued that next.
We glued ribbons around the chimney and glued a Christmas bead sticker and snowflakes to the back roof.
Then we took the ribbons and Noodles suggested that we twist them around each other like they do every year with the garland for their tree so we twisted and knotted the two skinny ribbons together to form garland which we then glued and strung around the log cabin under the roof.
![]()
Next we glued some poly-fil to the roof, on Santa's hat, and around the base of the house to create the effect of snow.
Following that we glued white, green and red glitter pompoms on top of the poly-fil snow and around the log cabin.
![]()
Here's the results of all four sides:
The left side.
![]()
The back.
![]()
The right side.
![]()
And, finally, the front.
![]()
Both Noodles and I were really pleased with our creation. It was bright, cheery, and definitely a wonderful Christmas decoration. I thought our creation looked like a white North Pole gingerbread house and Noodles quickly agreed. We both felt that his Grandmother would LOVE it.
He decided that instead of giving it to Mimi at Christmas that he would give it to her early so she could enjoy it during the holiday season. I thought that was an excellent idea.
Noodles and I had such a good time with our craft project that we decided we'd do something next year.
What and who it's for is a surprise.
For now that will be Noodles and Nana's secret.
Posted by Linda Walsh Originals- Doll Patterns for Grown-up Girls
Linda Walsh Originals E-Patterns - Instant Download E-Patterns for Grown-up Girls!
Linda Walsh Originals Dolls - Handmade Dolls & Crafts for Grown-up Girls!![]()
![]()
I know that I've mentioned many times before that when I was a young girl around the holidays my Mom and Dad would encourage us to create something new. Sometimes they helped us with the holiday projects and sometimes they didn't.
So, in talking to my grandson, Noodles, about what we would do when he came over one weekend in November we decided that making something together would be fun. We decided to make a Christmas present that he could give to his grandmother, Mimi.
His original idea was a plaque with the words Grandmother on it. We decided that when he got here we would go down to Michaels or AC Moore and buy the supplies we would need to make the Christmas plaque.
Usually it's Noodles and Nana shopping together, but this time Grampy decided to join us as we had decided to go out to eat afterwards.
So, off we went to Michaels. While Grampy was looking at picture frames Noodles and I went to the unfinished wood area. We looked at the unfinished wood plaques, but he wasn't really happy with them or their size. In looking around he first spotted an unfinished miniature train and thought maybe we could add a snowman or something.
Then he spotted an unfinished log cabin and came up with an idea for some sort of a winter scene. We talked about that and decided we could use the ends of the logs for affixing decorations and maybe add a tree or a Santa. I thought the woodland scene would be nice, so off we went to the paint aisle.
Given that it was a log cabin he decided that we should probably paint it brown. So, we bought a medium shade brown paint. Then off to the Christmas decorations section we went.
The first item he found in the miniature house section was a miniature tree under glass. He thought that would make a great addition but we didn't have a base for the house that it could sit on. So, we decided that we should add an unfinished piece of wood that we could use for a base. However, I thought the tree under glass, while pretty, was a little too big for our scene. So we settled on four miniature trees.
Then he found the miniature lights and thought they would be perfect for our scene. I agreed so we added those to our cart.
We continued walking around the Christmas section finding colorful stickers we could add for decorations and small hanging type ornaments. We found a few items we thought we might use for making some sort of a garland and he found some Christmas ribbons that he liked. Eventually we were joined by Grampy who added a few sticker suggestions of his own.
While we were looking at the bright and cheery Christmas decorations Noodles decided that painting the log cabin white would really make the Christmas decorations stand out. So, we decided to exchange the brown paint for white paint.
While Grampy went to stand in the long cash register line Noodles and I went back to get the white paint and to get an unfinished base. We settled on an oval base.
It was really cold and windy when we put the supplies in the car. It actually looked like it wanted to snow which just added more charm to what was already a delightful shopping trip.
After the supplies were loaded in the car off to dinner we went. At dinner Noodles and I had decided that we would take step-by-step pictures as we went along so I made a mental note to remember to get my camera.
I had decided that it might be best to paint the unfinished base and log cabin downstairs in the basement so off to the basement we went. After spreading the plastic underneath, getting the brushes, and getting the containers for the paint I set to painting the base while Noodles painted the log cabin. We ended up putting two coats of white paint on each and a light coat of satin finish acrylic.
Just as we finished the satin finish Noodles remembered we hadn't taken a picture. Ooops..... Nana's bad! So, I made a mental note that I wouldn't forget the camera in the morning which is when we had decided we would decorate the house.
Before we went to bed we glued the bottom of the log cabin to the wood base.
The next morning I woke Noodles up at 6:30 A.M. to start our project. We had agreed ahead of time that we would get an early start so we could finish before he had to go home. He happily got out of bed at 6:30 A.M. and came downstairs ready to begin.
So we did.......

Before we began decorating the house Noodles reminded me to take pictures.
Here's what the log cabin and base looked like painted and glued together.

Next, we tested the lights. At first only three came on. Then when we straightened out the string of lights they all came on. Noodles was delighted. However, when we wrapped the lights around the top of the house they, of course, stopped working. We were back to just three lights. We tried this several times until Nana just gave up. Oh, well. It was a nice idea.

Next we glued on the miniature trees - two on each side.

We had bought a foam Santa kit and thought the Santa might be cute coming out of the chimney. So we glued him together and then glued the finished Santa to the top of the chimney.

Next we glued the foam snowman together and then glued him to the right hand side of the log cabin just behind the trees.

We had bought three miniature unfinished wood dolls that we thought we could put in the windows, but when I tried to see how they would look I quickly realized there was no way we were going to be able to glue them inside. The doorway and windows were just too small.
So, we decided to glue paper wooden soldiers that we had bought in front of the windows instead. Plus, Noodles wanted the mistletoe over the door so we glued it just above.

We had bought a bunch of miniature presents, gingerbread men, and stocking stickers that we wanted to affix to the ends of the logs so we did that next.
We wanted to make sure all four sides were decorated so we added stickers to the top of each of the sides and to the back of the log cabin. We had also bought red and gold alphabet stickers so we decided to add the words, "North Pole" to the top of the back of the roof.
As we had an extra miniature soldier sticker we had decided to glue him in the middle of the back of the log cabin.
After that Noodles had found a blue and white adhesive backed "Let It Snow" felt saying that he wanted to put on the front roof so we glued that next.
We glued ribbons around the chimney and glued a Christmas bead sticker and snowflakes to the back roof.
Then we took the ribbons and Noodles suggested that we twist them around each other like they do every year with the garland for their tree so we twisted and knotted the two skinny ribbons together to form garland which we then glued and strung around the log cabin under the roof.

Next we glued some poly-fil to the roof, on Santa's hat, and around the base of the house to create the effect of snow.
Following that we glued white, green and red glitter pompoms on top of the poly-fil snow and around the log cabin.

Here's the results of all four sides:
The left side.

The back.

The right side.

And, finally, the front.

Both Noodles and I were really pleased with our creation. It was bright, cheery, and definitely a wonderful Christmas decoration. I thought our creation looked like a white North Pole gingerbread house and Noodles quickly agreed. We both felt that his Grandmother would LOVE it.
He decided that instead of giving it to Mimi at Christmas that he would give it to her early so she could enjoy it during the holiday season. I thought that was an excellent idea.
Noodles and I had such a good time with our craft project that we decided we'd do something next year.
What and who it's for is a surprise.
For now that will be Noodles and Nana's secret.
Posted by Linda Walsh Originals- Doll Patterns for Grown-up Girls
Linda Walsh Originals E-Patterns - Instant Download E-Patterns for Grown-up Girls!
Linda Walsh Originals Dolls - Handmade Dolls & Crafts for Grown-up Girls!


↧
Favorite Art Shows of 2011
Favorite Solo Show: James Jean “Rebus” at Martha Otero Gallery Favorite Group Show: “Water Works” at GR2 Favorite Artist in Group Show: Yoshitomo Nara in SugiPop! at LeBasse Projects Favorite Fiber Art Piece: Hine Mizushima in “Kamen Rider vs. Super … Continue reading →![]()

↧
A Little Bit on the Charitable Side: Every kid needs a toy for...

A Little Bit on the Charitable Side: Every kid needs a toy for the holidays. So when a Kidrobot employee checked the news for the local weather and saw an article saying Toys for Tots needed some toys, they quickly checked their inventory and sent 25,000 toys their way. This is the coolest story I’ve heard this holiday season. Thanks, Kidrobot.
↧
Make a contract for warmth with Kyubey earmuffs

As if one of these horrifying hellspawn wasn't enough, now, for some reason, you can get double the Kyubey and double the contracts with these new earmuffs from Ensky. Why anyone would want to willingly put this monster remotely in their general vicinity, let alone strapped to their head, is beyond me, but if you're so inclined then here's your chance.
Personally I'm not so sure who would be caught dead with these things on, no matter how desperately cold you might be. In the odd case you can't resist however, they're available now, just in time to keep you nice and toasty for the rest of winter...right before you turn into some nightmarish abomination.
[Order at Hobby Link Japan | Hobby Search | AmiAmi]


↧
↧
The best way to Buy Womens Back heel Shoes That wont Break your budget
Debbie K.Y. Loescher Contrary towards belief in addition to common concept, womens rearfoot shoes has become popular solely after gents first up and running wearing individuals. So next time your mankind has a little something negative to suggest to you will about individuals, gently advise him precisely men useful to wear these kinds of footwear [...]
↧
boredom busters of the arty kind: day 3
We’ve returned home from our Holiday celebrations to a great big mess, including lots and lots and lots of boxes. (that’s not including the several boxes worth of loot we’ve also hauled home with us – including 3 boxes full of vintage books and toys from my childhood – score!). It’s definitely a great week [...]
↧
Disney V.I.P. Dolls Available at DisneyStore.com
If you couldn’t find the Disney V.I.P. Dolls anywhere in time for Christmas or you weren’t willing to pay the astronomical prices they were being sold for online, now’s your time to purchase them at a great price from DisneyStore.com. Here are a few of the Disney V.I.P. dolls by Mattel that are available. AlexRead More
↧


