Though a great variety of modern toys have made their way into Myanmar toyshops especially in the cities partly due to globalization and trade liberalization, a number of Myanmar traditional handmade toys still win the hearts of young children in both urban and rural communities.
Welcome to Golden Land - The ultimate guide to Myanmar - Handymade Toys
↧
↧
Chin Up Over This Sweet and Unusual Early Steiff Dog


Overall, Chin Chin was produced in 10, 14, 17, 20, 22, 25, 28, and 35 cm from 1931 though 1939. Some of the smaller models had velvet muzzles and legs in addition to their velvet lined ears.

Steiffgal hopes this introduction to Steiff's rare Chin Chins has been a win win for you.
Have a question about one of your Steiff treasures? Let's talk! Click here to learn more.
↧
Figuarts Golden Darkness shines brighter with a pre-order
To-Love Ru's Golden Darkness has often drawn parallels to Nanoha's Fate, but she'll be branching out with a much more pure version thanks to the S.H. Figuarts line. Dressed from head to toe in elegant white, the ex-assassin looks quite a bit different from her usual style. It takes a little to get used to, but I think I'm a fan!
Despite her somewhat innocent look, this Figuarts version lets her show off all of her deadly skills, from hair transformation to turning her hands into rather unfriendly looking blades. Of course, you've got a number of extra facial expressions as well, though none of which being what you'd expect from a cold blooded killer. At the very least, she won't be assassinating your wallet! With pre-orders open for ¥4,725, there's certainly little reason for fans to pass up this unique Golden Darkness.
[Pre-order Golden Darkness]

↧
Prepare for Pokemon with new Sylveon goodies
With Pokemon X & Y fervor starting to reach new heights as more and more new information is released, the most diehard fans will be clamoring to get their hands on any new goodies hitting shelves. In case you're especially a fan of the new eeveelution, Sylveon, then good news! You can now pick up a number of plushies in various poses, along with even a keychain of the sprightly fox.
The cuddly group will run you around $19.99 to $34.99 USD, but Pokemon fans will know that's a small price to pay to complete collections or pick up a favorite. While I'm not quite sold on the "interesting" design choice for Sylveon's eyes, it's hard not to be in high spirits over any new merchandise! Eager trainers can browse the wares now and see if they'll find any opportunities for capture!
[Order at Pokevault]

↧
Yui Takamura Off Style Ver.
Is you being a fan of Muv-Luv Total Eclipse? Is Yui Takamura be tickling your wee fancy? If so then thi...
↧
↧
Splurrt x D-LuX Diggler (June 1 sale)
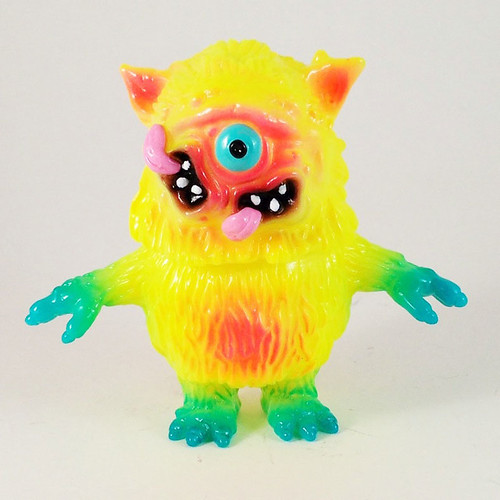
Dlux will be releasing custom-painted "Neo Hawaiian Diggler" come Saturday June 1st at 3pm eastern. With colors florescent yellow and pink on GID vinyl, the run is limited to 20 pieces and will sell for US$50 each via dlux.bigartel.com.

↧
Autobots? Ready to roll out! 'Transformers 4' Reveals "Hound"
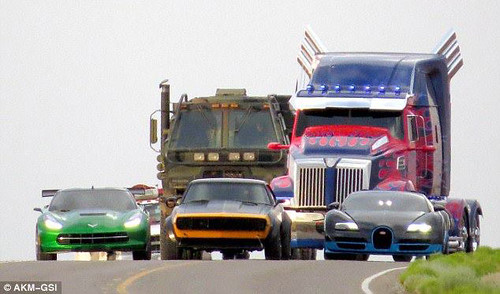
A slew of cars meant to be Autobots in the new "Transformers 4" movie has been revealed online last week, including two sporty cars, Bumblebee (which seemed to be embroiled in "scandal"), and a new look to Optimus Prime. Don't expect to be seeing your "Generation 1" designs anywhere near this 4th film, folks!
A new vehicle/truck named "Hound" has joined the crew, touted as "the always rugged and reliable Hound, one of the Family of Medium Tactical Vehicles from Oshkosh Defense." (via SHH). And that makes 5 x Autobots.

Seen up top is the group shot of Autobots (via), with a Law Enforcement vehicle at the back? If that is to be an Autobot, that would be swell. Personally one of my favs was "Barricade" - a Decepticon - disguised as a black-n-white law enforcement vehicle! So if this is to be "Prowl" of the Autobots? Then I'm good :)
(All images will be posted on Popcorn-X)
↧
Side Show Dunny SDCC Scavenger Hunt
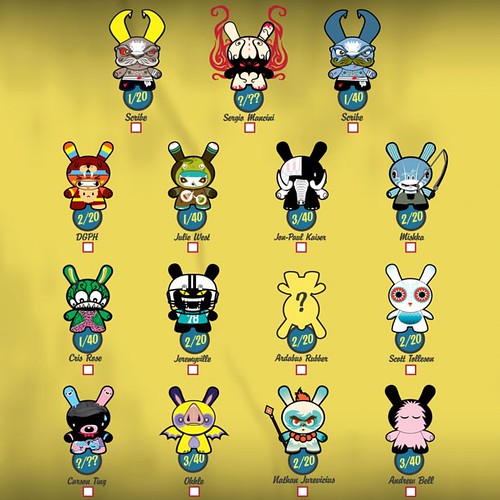
This image instagramed by Kidrobot for the coming "Side Show Dunny 2013" series had me a tad confused, especially with the names tagged to the designs some of which were jumbled up … but then again, it dawned on me, that perhaps it might well be a part of the promotions for The “Side Show Scavenger” Hunt that might snag you a SDCC exclusive? I am not 100% sure on this, but it sure as heck beats the alternative, that KR screwed up on the labeling, innit? Heh.
"Find the “leaked” Dunny ”line art”. Screen capture or print out, and label who you think each artist is according to vinyl figure. Upload your Oddity predictions to Instagram or our Facebook and tag #Dunny2013 and/or @kidrobot." (Read more via blog.kidrobot.com)A few very interesting points here in this pic tho: the listing of UK-artist "Cris Rose" (Congrats, Cris!) and a Yellow with Purple-accented Bat from Okkle (before it seemed like a Purple Bat instead) … I smell "variant(s)" …
↧
Volunteer Carol Liscianandrello allegedly stole 25k from Toys for Tots
Carol Lisciandrello is married to the former vice president of Toys for Tots. She's accused of stealing upwards of $25,000 dollars from the organization.
↧
↧
RC Helicopters, RC Toys & RC Hobby Craft
{My friend Ian shares a great post RC Helicopters, RC Toys & RC Hobby Craft |Ian gives away some
↧
RC Helicopters, RC Toys & RC Hobby Craft
RC Helicopters, RC Toys & RC Hobby Craft
↧
RC Helicopters, RC Toys & RC Hobby Craft
Check it out!
↧
RC Helicopters, RC Toys & RC Hobby Craft
Check this out from RC Helicopters, RC Toys & RC Hobby Craft !
↧
↧
RC Helicopters, RC Toys & RC Hobby Craft
A nice post from Ian!!
↧
Newest Kabaya Transformers are surprisingly nice looking
For a while now Kabaya has been doing lines of candy toys based on the Transformers franchise. For the most part the series has either recreated the original Generation One figures from the '80s and '90s in simpler forms or made entirely new characters for the series. However, now they've set their sights on taking to the original cartoon for inspiration.
Despite their simplified designs and small stature, the latest series consists of cartoon accurate versions of Autobot Aerialbot leader Silverbolt and the Decepticons Combaticon leader Onslaught and Stunticon leader Motormaster. Colors are a little off in places, but the best part is that they include the necessary parts to form their complete combined forms with the rest of their teammates. The additional team members haven't been seen yet, but It's easy to imagine they'll be included in subsequent releases.
The figures are more accurately small model kits molded in multiple colors and include stickers to complete the figures. They also come with little pieces of pretty bland tasting candy (hence the name candy toy). So far the only place offering them has been Amazon.co.jp, but the usual places should be taking orders soon enough. Amazon has given them a price of ¥2,520 for a box of eight and a release date of August 20. I, for one, will be camping the online shops until I get an order in for myself.

↧
The AFB Podcast Episode 66: Regular Show Toys / Blind Box and Bag Goodness

Join Scott, Ben, Justin and John for Episode Sixty Six of the Action Figure Blues Podcast! The AFB Podcast is a weekly look at action figures, statues and other collectibles from the worlds of comic books and pop culture.
This week our Toy of the Week is the Jazwares Regular Show Mordecai and Digby Action Figures, and our discussion topic is "Blind Box and Bag Toy Goodness".
If you can't use iTunes, you can download Episode Sixty-Six here now! Click on the link to listen, or right click to save the file! The podcast will always be available from the “Podcast” tab here - but if you can subscribe and give us positive ratings at iTunes, that will help us greatly!
The AFB Podcast is also on Stitcher Radio!
The AFB Podcast is also on Stitcher Radio!
Have a listen, and please give us some feedback at podcast@actionfigureblues.com - we might even read out your feedback on the next show!
Happy listening!
![]()
↧
PureNeemo Tsukiko wishes for you to pre-order her
Azone's popular PureNeemo doll line has placed their latest up for pre-order. The child-like Tsukiko Tsutsukakushi from the surprisingly good anime series the "Hentai" Prince and the Stony Cat (HENNEKO) looks really cute in her school uniform and flat expression. She uses 1/6 scale XS (extra small I'm guessing?) Flection body giving her a very small 23cm (nine inch) frame. Her hair is rooted in a soft vinyl head and she comes with 5 types of hands. Maybe it's just me, but the more I watch this series the more I think all Tsukiko figures should include her cat mask.
She's being sold for ¥12,000 and will be out in September. Pre-orders are being taken at the following stores:
[ Pre-order at HobbyLink Japan | Hobby Search | AmiAmi | CD Japan | Big in Japan | Big Bad Toy Store ]

↧
↧
Mattel Disney Pixar CARS Diecast: Kmart Francesco Fan Mater & Materhosen Arrives Early
No real shock, some Kmart’s have already placed the Francesco Fan Mater case out early … “Jeff M.” sends along this pic from last week. Thanks for the photo! “Lightyear” found the entire case out at his Kmart. There are 2 Materhosen’s, 1 Francesco Fan Mater, 1 Elvis RV, 1 Dustin Mellow (both re-releases that [...]
↧
My Embroidered "Crazy Autumn" Stitchery

Several years ago I bought a couple of creative embroidery and stitchery kits that I thought would be fun to do and have been trying to find some time to complete them ever since. Two weeks ago I finally had some time to work on one of them and decided to make the Fall themed stitchery from Chickadee Hollow Designs that I had bought.
The kit included the embroidery floss and the pattern included the design on pre-printed pre-colored fabric, as well as a basic embroidery stitches sheet and sheet of basic instructions for completing their stitchery.
I had decided ahead of time that I wanted to frame my stitchery as a picture instead of finishing it the way the pattern had suggested which was to add strips to the sides and finish it as a small quilt. I opted instead to finish mine as a stitchery picture and blanket stitch around the edges.
The stitchery design was pre-printed on pre-colored fabric and folded down the middle so as to fit inside the standard pattern envelope. The design was fine except I had a very difficult time ironing the crease out. I couldn't spray the design with water to help iron the crease out as the design was pre-printed and would have run. I did the best I could and hoped that when it was finished and stretched the design that the crease wouldn't be as visible.
The instructions called for adding fabric borders around the sides and on top of the batting so as to finish as a quilt. However, the pattern didn't include a picture of the finished piece just the picture as shown below:

The pattern included a sheet of general embroidery stitches, steps for finishing as a quilt, and instructions to use one or two strands of the embroidery floss on the design. However, the pattern didn't tell you which stitches to be used and where and whether you were to use one or two strands in any particular area. It was basically left up to the user to choose which embroidery stitch to use and whether to use one or two strands.
The instructions called for positioning the design over a larger piece of Warm-N-Natural batting and fastening this with small safety pins then embroidering the stitchery. The pre-printed pre-colored fabric design was so close to the edge that I knew it was impossible to fit within any embroidery hoop without creating more creases.
My experience has always been that embroideries always come out better when stretched in an embroidery hoop so I chose to baste the pre-printed sheet to a standard felt square so that I could put in into a wooden embroidery frame as shown in the picture below:

As I wanted to finish this as a stitchery picture with blanket stitching around the edges I decided to embroider around the edges of the design using a 3-strand 3-color embroidery floss combination. I had opted to use this same 3-strand 3-color embroidery combination to frame the inside "Autumn" rectangle and was pleased with the result and thought a similar border around the design would be complimentary.
When my embroidery piece was done I removed it from the embroidery frame and cut it along the brown dotted lines about 1/4" from the edge of the stitchery outline.
I decided I would add one layer of quilt batting and a back piece of felt to my stitchery and to blanket stitch around the edges. Using the stitchery as a guide I cut out a piece of batting and a piece of felt for the backing and then layered them. Since I was pleased with the 3-strand 3-color embroidery combination of the center rectangle and design border I decided to use it to blanket stitch around the edges and like how it turned out as shown in the picture below:

As mentioned previously I was going to put my finished stitchery in a picture frame and had decided to use decorative paper as a background for my stitchery. The choice was between an evergreen colored background, bright yellow background or a rust colored background. I chose the rust colored background as shown in the picture below:

I had chosen a small black metal frame for my finished piece as I wanted the emphasis to be on the stitchery and not on the frame. It took me 26 1/2 hours to complete this picture including the framing and was thrilled with the way it turned out. I hope you like it as much as I do.
Posted by Linda Walsh Originals- "Doll Patterns for Grown-up Girls!"
Linda Walsh Originals E-Patterns - "Instant Download E-Patterns for Grown-up Girls!"
Linda Walsh Originals Dolls - "Handmade Dolls & Crafts for Grown-up Girls!"

↧
Lego X-Wing: The 5-Million Brick Life Size Edition
Well, 5,335,200 bricks – a 42X version of the one you can buy in stores. It was in Times Square last week. You can read more at TVGuide.com Pretty sweet. I’d like one in the backyard … Tweet This Post
↧
More Pages to Explore .....


